
Installing ZEROXCLUB B2 wired license plate backup camera can greatly enhance your driving experience and improve safety on the road. Whether you're a seasoned DIY enthusiast or a beginner, this step-by-step guide will help you install your license plate backup camera with ease.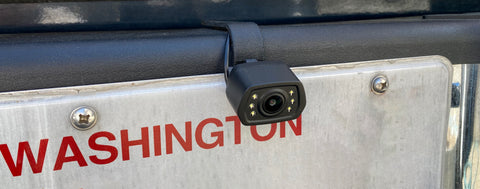
Professional Installation Advisory
This product involves electrical connections to the vehicle's wiring system. It is recommended that installation be performed by a person familiar with automotive wiring and electrical systems. If you are not confident in your ability to complete the installation safely and correctly, please consult a qualified automotive technician or professional installer.
Recommendations
Before drilling into the bumper, check if the license plate light assembly can be removed to route the camera cable through its existing opening, eliminating the need for an additional hole.
A: Installation Steps
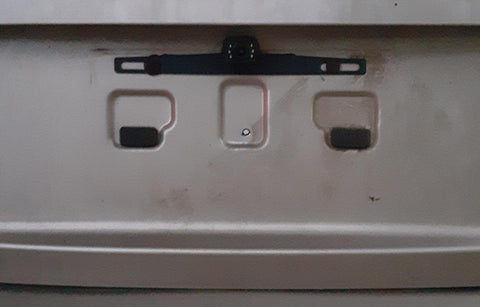
(A1) Positioning: Temporarily place the camera over the intended license plate screw holes to confirm placement and cable routing path.
(A2) Cable Routing: If necessary, drill a small hole in the license plate area (ensuring the interior side is clear) just large enough for the camera cable. Route the cable into the vehicle interior (e.g., trunk/hatch).
B: Wiring at the REAR of the Vehicle
Connect power to turn the camera on when in reverse.
(B1) Identify Wiring: Use a multimeter to locate the wiring for one of the vehicle's reverse lights’ ground wire and a 12V positive wire.
(B2) Understand Your Wires
① The RCA Video Cable: it has a yellow RCA connector for video and a small Red "Trigger" wire attached to it.
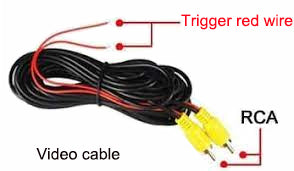
NOTE: The two small little red wire on RCA video cable is trigger wire. If you need them to work please connect them follow the steps. If you don't need them to work you can ignore them.
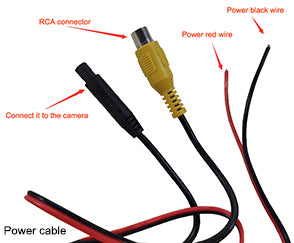
② The Y Splitter Power Cable: 4-pin to RCA and a Red (positive) / Black (ground) wire.
(B2) Connect together:
One small red trigger wire from RCA video cable (if need).
The red wire from the Y splitter power cable.
The reverse light positive wire.
(B3) Ground: Connect the Black wire from the power cable to a clean metal ground point on the chassis. (Note:If it introduced a lot of flicker/lines to the picture - the negative connection is not needed)
C: Routing the Cable to the Front
(C1) Run the RCA video cable from the camera to the dashboard.
(C2) Route the cable through the vehicle's interior (e.g., under door trim, under carpet, through a headliner).
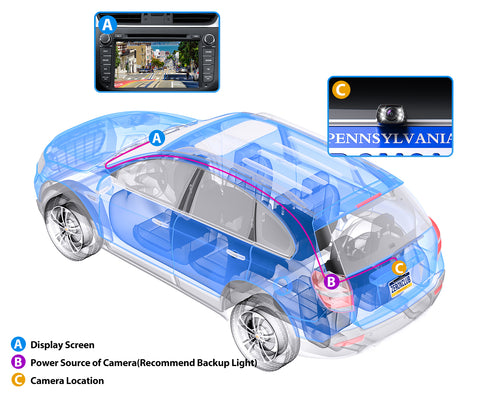
D: Wiring at the FRONT Dashboard
Connect the video signal to your stereo.
(D1) Connect the Video: Plug the yellow RCA connector into the "Camera Input" or "Rear View" port on your monitor or stereo.
(D2) Connect the Front Trigger Wire (If Needed):
For those with aftermarket head units that can automatically switch the display to the reversing camera: Your stereo may not need this wire if it's already connected to your vehicle's reverse signal or (if you didn't wire it) it tells you it finds no camera when you put it in reverse. Try taping it off first—if the screen doesn't auto-switch, proceed below.
If Required: Connect the small Red Trigger wire at the dashboard end of the RCA cable to your stereo's "Reverse Trigger" wire (often labeled Reverse, Backup, or Camera Trigger).
Summary: A Quick Wiring Checklist
| Cable / Wire Color | Where to Connect It |
|---|---|
| Two Red Wires (at rear) | Splice together into the reverse light's positive (+) wire. |
| One Black Wire (at rear) | Connect to a metal ground point on the vehicle chassis. |
| RCA Plug (at front) | Plug into the "Camera In" port on your stereo/monitor. |
| Small Red Trigger Wire (at front) | Connect to your stereo's "Reverse Trigger" wire (if need). |
E: Test:
(E1) Test the system: With the vehicle in reverse, the camera view should automatically display on the head unit, and the reverse lights should function normally.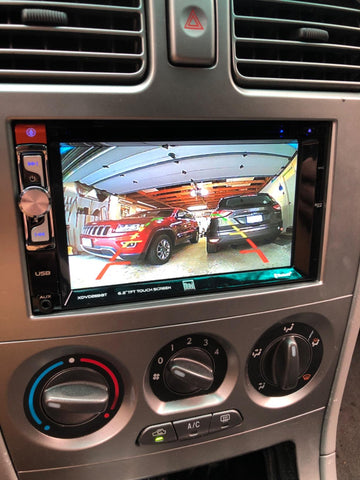
(E2) If the test is successful, reassemble all vehicle trim panels.
(E3)Secure and Tidy Up: After confirming that everything is working correctly, it's time to secure the wiring. Tuck the excess wiring away to prevent it from interfering with other components or becoming a distraction while driving and ensure a clean and professional installation.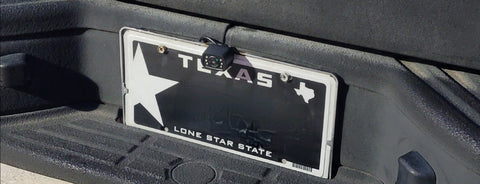
⚠️ Important Tips for Success
● Secure Connections: Securely connect all wires to ensure stable operation. Use proper wire connectors (e.g., butt splices, solder) and electrical tape. Loose taps are a common cause of failure.
● Test Before Finalizing: Temporarily connect all wires and have a helper shift the vehicle into reverse to confirm the camera image appears on the screen before securing all wires and trim panels.
● If your radio has a camera button (to switch camera on when you’re not in reverse) you can run the power wire to constant power or ACC, but the LED lights on the camera won’t shut off. You can put electrical tape over the lights.
● The instructions provided are a general guide. If you are not experienced with automotive electrical systems or vehicle modification, we strongly recommend having the camera installed by a qualified professional. Improper installation may lead to product damage, vehicle electrical issues, or safety hazards.
By following these steps, you can successfully install the B2 license plate backup camera in your vehicle. Enjoy the added convenience and peace of mind that comes with having a clear view of what's behind you while on the road.