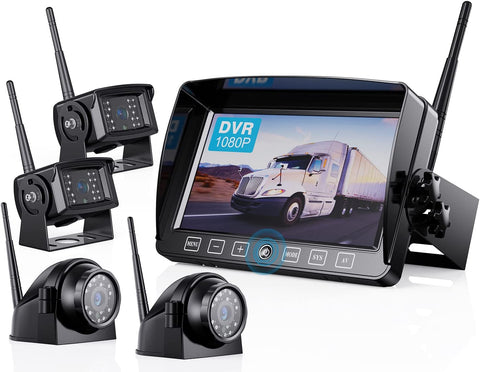
Do you wish there was a way to make reversing and parking easier and safer? Look no further than the 7-inch Capacitive Button Monitor Wireless Backup Camera System! In this blog post, we will answer some frequently asked questions about this system.


Q: What are the monnitor dimentions?

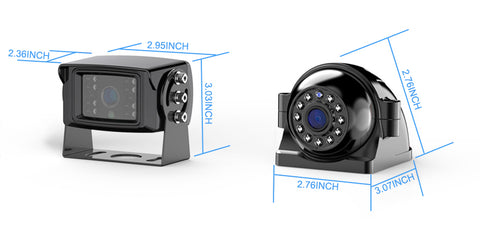
Q: What are the camera dimentions?
Q: Does the dashboard Monitor have to be plugged into a cigarette lighter?My vehicle do not has a 12v accessory plug.
A: Package comes with cigarette lighter 12V plug and DC power cord. If your vihicle do not have a 12v power port (cigarette lighter port), it can be hard wire for power.
Hardwired method: The red wire is connected to the car ACC, and the black wire is connected to the ground wire.
Q: Are monitor and camera battery powered?
A: No, the monitor and camera are wired for power.
Q: Can the screen be powered by USB?
A: No, you can either hardwire it or use the enclosed cigarette power source.
(If your vehicle only has a Type-C or USB out, you can add a Type-C to DC Power cord or a USB to DC Power Cord).
Q: Can I add an extra camera?
A: Yes, the system support up to 4 cameras.
The link of the rear camera: B07S7PZ44T
The link of the side camera: B09957S58J
Q: How do I pair the camera?
A: The pairing process for the camera is as follows:
1. Disconnect the power to the unit and then keep the camera and monitor within 3 feet when pairing
2. Ensure the antennas of the cameras are connected and tightened.
Reconnect the monitor and turn it on.
3. Switch to the full screen (Not in full screen state, the menu button will not be able to operate.)
4. Access the menu and choose the PAIRING icon
5. The screen begins to count down
6. Power up to the camera during the count down(NOTE: Do not plug the camera into the power until the pairing count-down had already started.)
7. Wait for the pairing
8. Repeat the steps again if it is unsuccessful.
Q:Why is there no image after pairing? What should I do if the pairing fail?
A: 1. When pairing, the distance between the camera and the screen is too far. Make sure to keep it within 3 feet.
2. Connecting the camera prematurely. Do not plug the camera into the power until the pairing count-down had already started.
3. Loose connection. Confirm connections are tight and correct.
4. The voltage is not enough 12V+. Change another 12V battery or order a 12V DC power adapter filter rectifier to test.
5. Pairing is interfered with. Please disconnect all cameras and connect the camera to be paired according to the pairing steps.
6. Check if the little pin on the inside of the power plug for the camera is broken off.
7. Check if the little pin on the inside of the plug for the antenna is broken off.
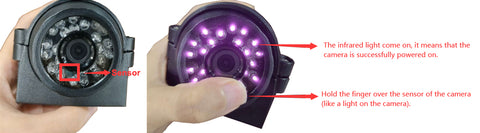
Q: How do I know if the camera is powered?
A: Cover the camera's light sensor (like a light on the camera) with your hands.
If the infrared light is on, it means that the camera is successfully powered on.
If the infrared light is not on, it means that the camera has not been powered on. Please check the wiring or use another power source and power cord to test.

Q: How to switch to the channels?
A: Touch the AV button.
Q: Why is there no option to show 4 cameras at once?
A: You may have turned off one or more channels, If you would like all 4 cameras shows at the same, please turn on all channels and select quad split or H split mode.
Q: How to turn on/off the channels?
A: Menu>CAM-SETUP>CAM1/CAM2/CAM3/CAM4>ON/OFF
Q: How to start/stop recording?
A: Press MODE button Or MENU >RECORD>ON/OFF
Q: How to do if the screen is upside down?
A: Press and hold the -- button for 5S (If you are on the Menu page, press Menu to return to the camera view before performing this operation.)
Q: Why can't I operate the Menu button?
A: In split-screen or recording, the MENU button will be locked and cannot be operated, you need to switch to single-screen mode and stop recording in order to operate.
Q: What if a lock appears on the screen and the system is locked?
A: You need to press and hold the MENU button, and it will show the unlock icon, then press MODE button to confirm, the system will be unlocked.
Q: What to do if the screen buttons don't work?
A: Please contact us at sales@uszeroxclub.com with your order number and the video of the problem, we will send a replacement to you. To save your time, you do not need to send back the original item.
Q: Can I use a wireless backup camera at night?
A: Yes, wireless backup cameras are designed to be used both during the day and at night. These backup cameras are equipped with IR night vision technology, allowing you to see clearly in low-light conditions. This feature is especially useful when backing up in dark areas or during nighttime parking.
Q: How do I hook up a wireless backup camera?
A: Start by checking if the system is paired, if not, pair the camera with the monitor using the provided instructions. Then, locate the power source for the camera and mount it onto your vehicle. Next, connect the camera to a 12-volt power supply. Fanally, find a suitable spot to install the monitor inside your car, and connect it to a power source as well and you’ll be ready to enjoy a clear view of what’s behind your vehicle.
Q: How do I hook up the side camera?
A: The installation video from our customer.
Q: How to Connect the Backup Camera to Power?
A: The best way to get power to a wireless RV backup camera is to connect it to one of the running/reverse lights on the back of an RV.
In most cases, the running lights of your camper have to be on in order for the RV backup camera to get power, or you need to be in reverse.
Note: Because the backup camera is drawing power from a running light you will need to turn on the lights or go into reverse in order to get it to turn on.
Note: If the camper trailers don’t have the upper tail/running lights wired into the reverse lighting system and you will need to manually turn on the lights to use the camera.
Q: How do I make the backup camera stays on all the time?
A: To use as a security camera the RV backup camera needs to be connected directly to a 12 volt battery so it can stay on all of the time and not just when connected to a tow vehicle with the lights on.
What is the 7-inch Capacitive Button Monitor Wireless Backup Camera System?
The 7-inch Capacitive Button Monitor Wireless Backup Camera System is designed to assist drivers in parking and reversing their vehicles. The monitor provides a clear and detailed view of the rear of the vehicle, allowing drivers to navigate tight parking spaces and avoid obstacles with ease.
What are the key features of the 7-inch Capacitive Button Monitor Wireless Backup Camera System?
The 7-inch Capacitive Button Monitor Wireless Backup Camera System offers a range of impressive features, including:
- A large 7-inch capacitive button monitor for easy viewing
- 2.4ghz Wireless transmission of the video feed for hassle-free installation
- A wide-angle camera lens for a comprehensive view of the surroundings
- High-resolution video quality for clear and detailed images
- IR Night vision capability for enhanced visibility in low-light conditions
- IP69k Waterproof camera design for durability and reliability
What are the benefits of using the 7-inch Capacitive Button Monitor Wireless Backup Camera System?
Using the 7-inch Capacitive Button Monitor Wireless Backup Camera System offers several benefits, including:
- Improved safety: The system helps drivers avoid accidents and collisions while reversing or parking.
- Convenience: Parking becomes easier and less stressful, especially in tight spaces.
- Time-saving: The system allows for quicker and more efficient parking, saving time in busy parking lots.
- Peace of mind: Drivers can have peace of mind knowing they have a clear view of their surroundings.